Expanding the size of a VMware disk can enhance performance and storage capabilities. This process is crucial for handling larger amounts of data and improving the efficiency of your virtual machine.
In this guide, learn the steps to easily and safely increase the size of a VMware disk. Whether you’re managing a business server or a personal project, understanding how to adjust your virtual disk is vital. With VMware, you can customize disk space without disrupting your existing setup. By following this tutorial, you will ensure optimal performance and storage for your virtual environment. Let’s explore the practical steps to optimize your VMware disk space effectively. For reliable hosting solutions, consider Liquid Web for high-performance servers and exceptional support.

Credit: www.wikihow.com
Introduction To Vmware Disk Management
Managing VMware disks is crucial for optimizing virtual environments. Understanding how to increase the size of a VMware disk helps maintain performance and storage efficiency.
Understanding Vmware Virtual Disks
VMware virtual disks are files stored on a datastore. They simulate physical disks for virtual machines (VMs). These disks can be of various types, such as thin-provisioned, thick-provisioned, and eager-zeroed thick.
Thin-provisioned disks: Allocate storage space as needed, saving space.
Thick-provisioned disks: Allocate all requested space upfront.
Eager zeroed thick disks: Allocate and zero out space upfront, ensuring better performance.
Knowing the type of disk is essential for effective management.
Importance Of Disk Management In Virtual Environments
Disk management in VMware is vital for several reasons:
Performance: Proper disk management ensures optimal performance of virtual machines (VMs).
Storage Efficiency: Efficient use of storage resources minimizes waste and optimizes resource utilization.
Scalability: Easily expand storage as your needs grow.
Data Integrity: Regular management prevents data loss and corruption.
Neglecting disk management can lead to resource exhaustion, poor performance, and potential data loss.
To learn more about VMware disk management, consider exploring Liquid Web Hosting Services. They offer managed hosting solutions, customizable options, and 24/7 support, ensuring your virtual environment runs smoothly.
Prerequisites For Increasing Vmware Disk Size
Before increasing the size of a VMware disk, specific prerequisites must be met. Ensuring these requirements are fulfilled will make the process smoother and safer for your virtual environment.
Necessary Tools And Software
First, you need the right tools and software. Ensure you have the following:
VMware vSphere Client or VMware Workstation: Essential for managing and configuring virtual machines.
Administrator Access: Necessary permissions to make changes to the virtual machine.
Disk Management Tools: Tools like GParted or Windows Disk Management for resizing partitions.
Ensuring Data Backup And Safety
Data safety is critical. Always create a backup before making changes. Follow these steps to ensure data safety:
Backup Virtual Machine: Use VMware tools or third-party software to create a full backup.
Verify Backup Integrity: Ensure the backup is complete and can be restored if needed.
Document System State: Note down the current configuration and settings of the virtual machine.
Having these prerequisites in place will help ensure a successful increase in the VMware disk size without data loss or system downtime.
Tool/Software | Description |
|---|---|
VMware vSphere Client | Manages and configures virtual machines |
Administrator Access | Allows changes to the virtual machine |
Disk Management Tools | Used for resizing partitions |
Step-by-step Guide To Increasing Vmware Disk Size
Increasing the size of a VMware disk is essential for managing disk space effectively. This guide will walk you through each step to ensure a smooth process. Follow these detailed instructions to increase your VMware disk size easily.
Accessing Vmware Vsphere Client
First, open the VMware vSphere Client. This is the primary interface for managing your virtual machines. Ensure you have the necessary permissions to make changes.
Locating The Virtual Machine And Its Disk
In the vSphere Client, navigate to the Inventory section. Find the virtual machine you want to modify. Click on the virtual machine to view its settings.
Shutting Down The Virtual Machine
Before making any changes, shut down the virtual machine. Right-click the virtual machine and select Shut Down Guest OS. Wait until the machine is completely powered off.
Editing The Virtual Machine Settings
With the virtual machine powered off, right-click it again and select Edit Settings. A new window will open with various configuration options.
Increasing The Disk Capacity
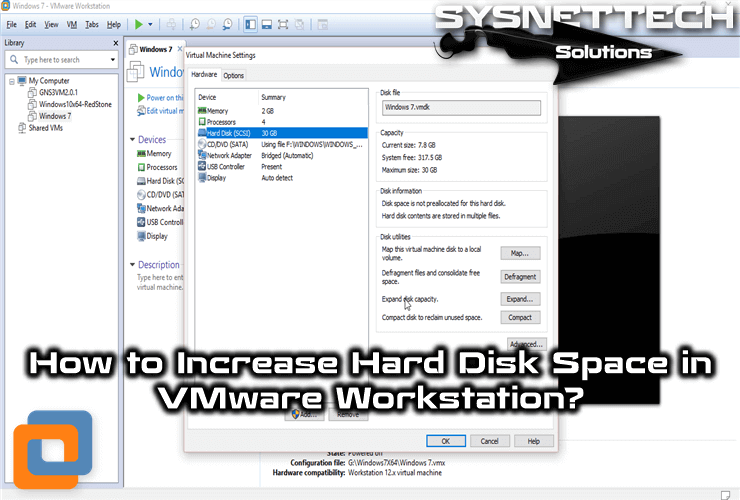
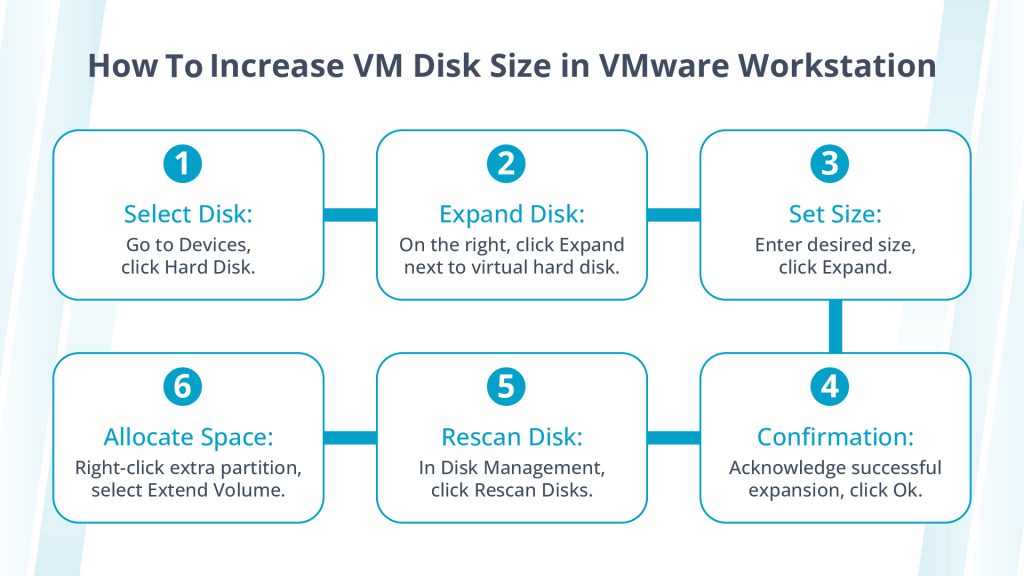
In the settings window, locate the disk you want to expand. You will see an option labeled Provisioned Size. Increase the value to the desired disk size. Click OK to apply the changes.
Reconfiguring The Operating System To Recognize The New Disk Size
After increasing the disk size, power on the virtual machine. Access the operating system and use its disk management tools to recognize the new space. For Windows, you can use Disk Management. For Linux, use fdisk or parted commands.

Credit: www.sysnettechsolutions.com
Post-expansion: Verifying And Managing Disk Space
After expanding your VMware disk, it’s crucial to verify and manage the new disk space within the operating system. This ensures that your system recognizes and utilizes the expanded storage effectively. Below, we delve into the steps for verifying disk expansion and managing the newly allocated space.
Verifying Disk Expansion In The Os
To confirm the disk expansion, follow these steps:
Open your operating system’s disk management tool.
Check the new disk size. Ensure it matches the expanded size.
Use commands like lsblk in Linux or diskpart in Windows.
If the size appears as expected, the expansion was successful. If not, recheck the VMware settings.
Managing And Allocating New Disk Space
Once verified, allocate the new space:
For Windows:
Open Disk Management.
Right-click the expanded disk.
Select Extend Volume.
Follow the wizard to allocate space.
For Linux:
Use fdisk or parted to resize partitions.
Execute resize2fs for ext4 filesystems.
For LVM, use lvextend followed by resize2fs.
Properly managing the expanded disk space ensures optimal performance and utilization of your VMware environment.
https://www.youtube.com/watch?v=4idTFPBUIRk
Common Issues And Troubleshooting
Expanding the size of a VMware disk can sometimes lead to various issues. Understanding these common problems and knowing how to troubleshoot them is crucial. Below, we address some common issues and provide solutions to ensure a seamless disk expansion process.
Handling Disk Expansion Errors
Encountering errors during disk expansion is not uncommon. Here are some steps to handle these errors effectively:
Check Disk Space: Ensure there is enough physical disk space available on the host.
Verify Permissions: Make sure you have the necessary permissions to modify the disk.
Review Logs: Examine the VMware logs for any error messages that can provide clues.
Use Correct Tools: Utilize VMware’s built-in tools, such as vmkfstools, for accurate disk expansion.
Ensuring Disk Space Is Recognized By The Os
After expanding the VMware disk, the new space must be recognized by the operating system (OS). Follow these steps to ensure the OS identifies the added space:
Rescan Disks: Use the OS’s disk management tool to rescan the disks.
Extend Partition: Use tools like Disk Management (Windows) or GParted (Linux) to extend the existing partition to include the new space.
Reboot System: A simple reboot can help the OS recognize the new disk space.
Resolving Performance Issues Post-expansion
Expanding a disk can sometimes lead to performance issues. Here are some ways to resolve these problems:
Issue | Solution |
|---|---|
Slow Performance: | Check for disk fragmentation and defragment if necessary. |
High Disk I/O: | Monitor disk I/O and optimize applications to reduce load. |
Cache Settings: | Review and adjust cache settings to improve performance. |

Credit: www.liquidweb.com
Best Practices For Vmware Disk Management
Managing VMware disks efficiently is crucial for maintaining optimal performance and ensuring the longevity of your virtual environment. Following best practices can help prevent issues related to disk space and performance, ultimately saving time and resources. Below are some key strategies to consider.
Regular Monitoring And Maintenance
Regular monitoring of your VMware disks is essential. Use tools to track disk usage and performance metrics. Identify and resolve issues before they escalate.
Conduct routine checks for disk health.
Monitor disk I/O performance.
Identify and clean up unused or old snapshots.
Maintenance tasks, such as defragmentation and partition alignment, can improve disk performance. Schedule these tasks during off-peak hours to minimize disruptions.
Optimal Disk Space Utilization
Efficient use of disk space ensures that your virtual machines (VMs) perform well. Avoid over-provisioning, which can lead to wasted resources.
Allocate disk space based on actual needs.
Use thin provisioning to optimize storage.
Regularly review and adjust disk allocations.
Consider using deduplication and compression techniques to maximize available storage space. These methods help reduce the amount of data stored, freeing up valuable disk space.
Planning For Future Disk Expansions
Planning for future growth is vital. Anticipate and prepare for disk space expansion to avoid performance bottlenecks.
Planning Aspect | Action |
|---|---|
Capacity Forecasting | Analyze growth trends and forecast future needs. |
Scalable Solutions | Choose scalable storage solutions to accommodate growth. |
Upgrade Planning | Plan upgrades during low-usage periods. |
By planning, you can ensure a seamless expansion process. This helps maintain high performance and prevent downtime.
Frequently Asked Questions
How To Increase Disk Size In Vmware?
To increase the disk size in VMware, follow these steps: Open VMware, select the virtual machine, go to Settings, select the hard disk, click “Expand,” specify the new size, and confirm. Then, use disk management tools in the guest OS to allocate the new space.
Can You Increase The Size Of A Virtual Disk?
Yes, you can increase the size of a virtual disk. Use disk management tools or hypervisor settings. Adjust partition sizes accordingly.
Why Can’t I Extend the Disk Size in VMware?
You can’t extend disk size in VMware due to snapshots, incorrect disk type, or insufficient host space.
How Do I Increase The Disk Size?
To increase the disk size, open your disk management tool, right-click the Volume, and select “Extend Volume. ” Follow the prompts.
Conclusion
Increasing the size of a VMware disk is now within your reach. Follow the steps outlined to enhance your virtual machine’s storage. Remember to back up your data before making changes. Do you need reliable hosting for your virtual machines? Check out Liquid Web for high-performance solutions. Their robust infrastructure and 24/7 support ensure seamless operations. Upgrading your VMware disk is a smart move for better performance. Implement these tips today and experience the benefits of a larger disk size. Happy computing!
